Ranch-Rite hay equipment serves as a high value line of tractor attachments for small to medium sized farms. In 2013 we saw upgraded wheel bearings and the inclusion of heavy duty, 6-ply tires. These tedders ship partially assembled, and will require 1-2 people during assembly. This How-To will guide you through the assembly of your new Ranch Rite HT-10.
Lay the main gearbox assembly on it’s top with the output shafts on the rotors facing up.
Turn one of the rotors to align one of the 6 grooves in the rotor with the cross shaft of the main gearbox assembly
Ensure the grooves closest to the connecting shaft on the opposite rotor are now at 45° angles to the cross shaft.
If they are not aligned properly, gently lift on the rotor and realign it to the correct specification (The outer gearbox is filled with grease. Be sure not to allow anything to enter the gearbox)
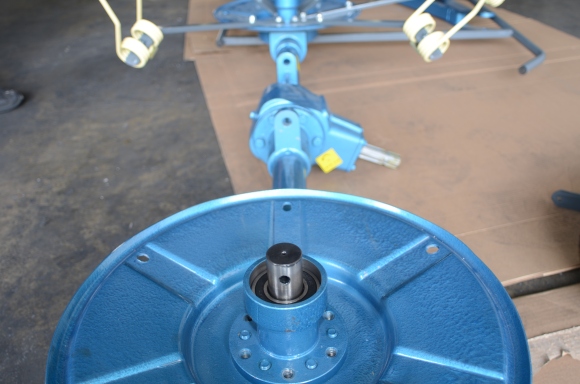
Place the axle assembly over the output shaft of the rotor gearbox.
The tip of the axle should point away from the center of the machine.
Drive the set pin into leg with a hammer to attach it to the rotor, sealing the gearcase.
Repeat on the second rotor.
Install wheels as shown
(large cap, wheel, small cap, 24mm nut)
The pre-assembled rotor arms are meant for a specific rotor. Use the picture on the front of the gearcase to determine which rotor arms go on which rotor (enlarge photo by clicking on it).
Begin attaching the pre-assembled rotor arms to the rotor, starting with the 18mm inner bolts. Be sure to use a washer on each bolt. Finger tighten the bolts until you are ready to torque them down.
Make sure the outer holes line up on the rotor and rotor arms.
Insert an 18mm bolt with washer through the outer holes.
Use a locking washer and 19mm nut to complete the attachment of the rotor arms. Finger tighten until you are ready to torque them down.
Locate the two holes on top of the rotor where you will attach the wings/guards.
Hold the wing/guard in place and attach it using two 18mm bolts with washers.
This may require 2-3 people.
Locate the two brackets on either side of the center gearbox. This is where you will attach the tow bar/safety cover.
Insert and fasten a cotter pin into one side of the long attachment shaft.
While holding the tow bar/safety cover in place, pass the attachment shaft through both sides of the tow bar/safety cover making sure to pass through both brackets as well.
Fasten a cotter pin on the second side of the attachment shaft.
Locate the upper attachment bracket for the manual adjuster arm.
Pass the adjuster arm through the bracket, securing it with a cotter pin.
Using the small attachment shaft and 2 cotter pins, connect the adjuster arm to the lower attachment bracket next to the center gearbox.
You may need to adjust the angle of the tedder slightly while attaching the lower end of the adjustment arm.
Check all bolts to be sure that they have been torqued down.
You are now ready to attach the tedder to the tractor.
Be sure to set the proper angle for either towing or tedding, using the adjuster arm.
Click the image below to navigate to our eBay listings for the 2 star, 10 foot Ranch Rite Hay Tedders.
Rite-Products


I need instructions on how to assemble the HT-20
Hi Ray,
We just finished our first round of assembly videos for the farm equipment. You can find the assembly video for the HT-20 by following this link to our youtube page: Ranch Rite HT-20 Assembly Video. Thanks so much for your support.
Ranch-Rite